bravwel dwell

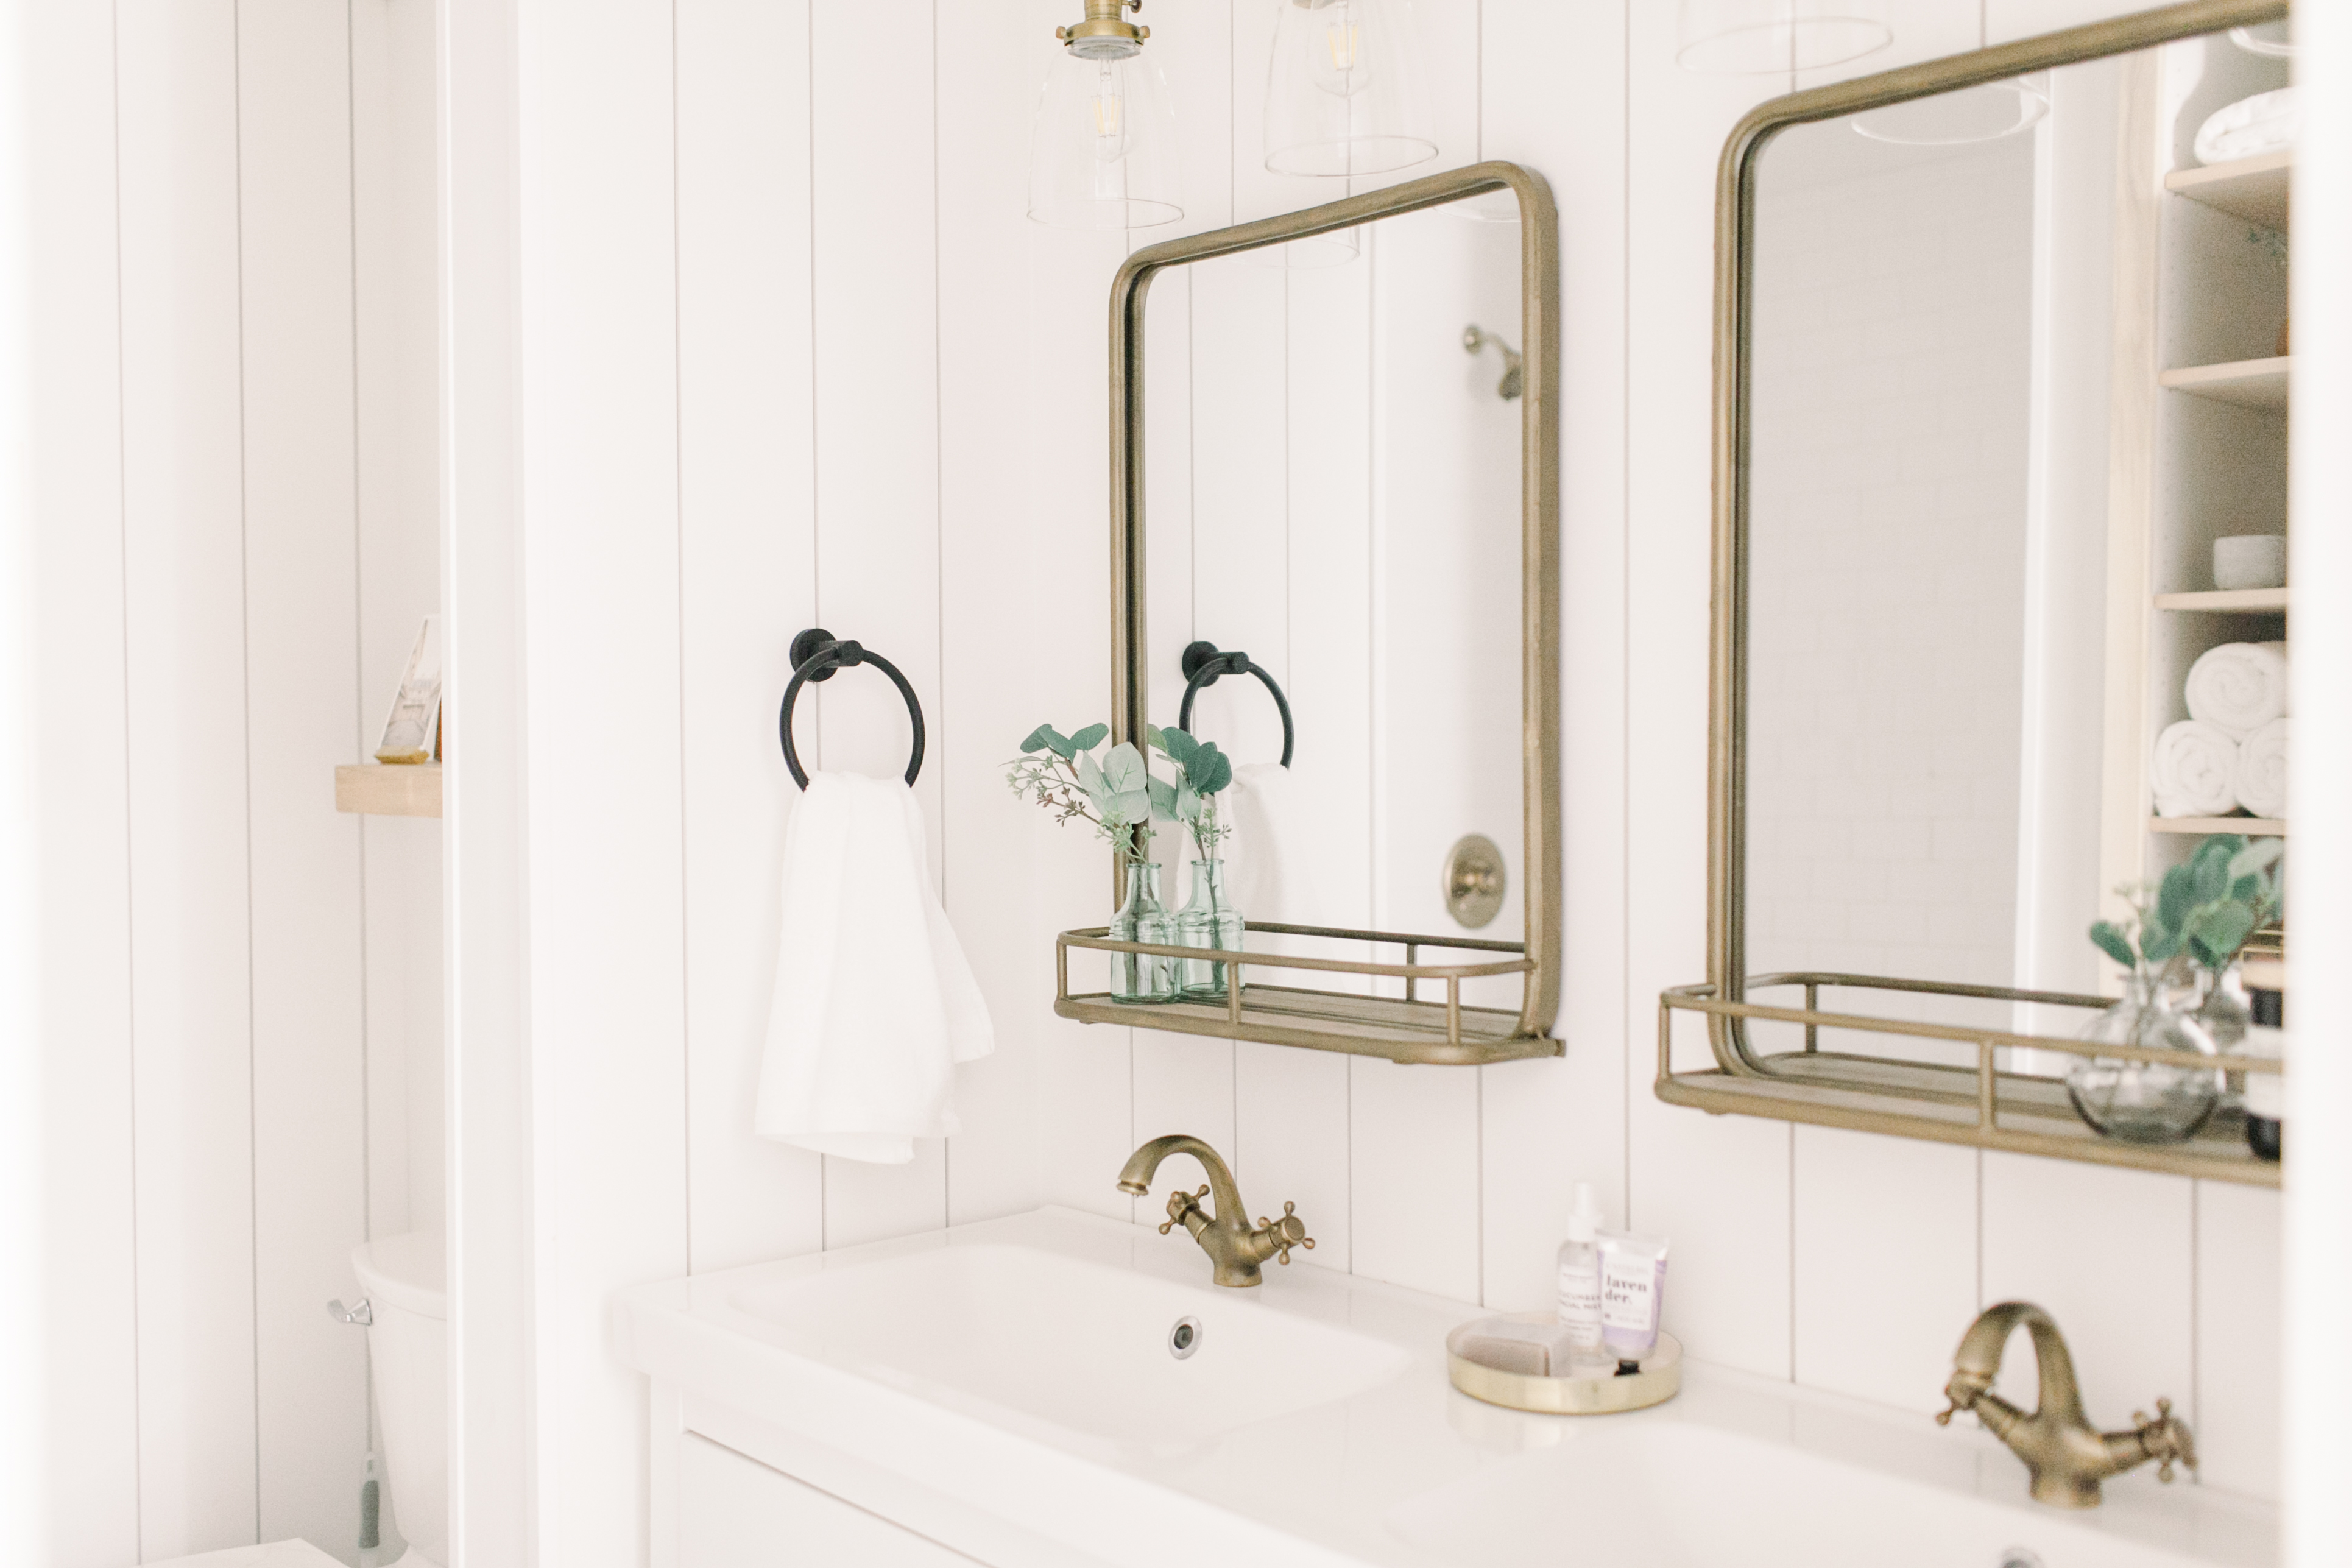
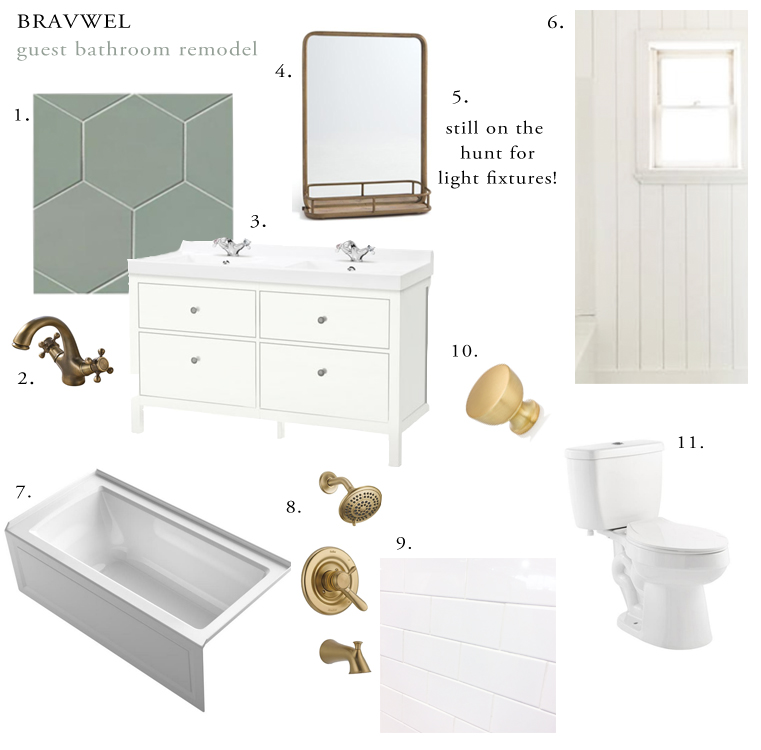
Our Guest Bathroom Reveal

It’s here. Finally. Finnaaalllyyy.

This was definitely the biggest renovation challenge (so far) with our house. We added a shower to the existing bathtub, went from a single to a double vanity, added an additional sconce above the vanity…and the list goes on. But it’s done and we could not love it more. And because there truly is nothing better than a before and after, let’s reminisce about what it looked like when we bought the house.

First of all, the vanity was so low. I’m 5’3″ and even I had to bend over to wash my hands so it was just really uncomfortable. We took all of that out, split the plumbing (which was an ordeal all in it’s own) and split the lighting for the double sconces.

I was SO happy to rip out that tiled ledge..uhh..seat?? Whatever it was we were thrilled to see it go. We went back and forth about doing all open shelving or all closed shelving but I love what we ended up with. Doing the pull out laundry hamper really was the best idea and I still get my pretty open shelving!

We had to add plumbing to create a shower and Adam made sure the shower head was extra high so he won’t have to crouch just to wash his hair (our master shower is comical how low it is). I won’t lie, we now exclusively use this shower because it’s so nice.

And now onto the pretty details of the space. We are so happy with how it all turned out! Scroll to the bottom of the post for all of the sources.


Sources

Hex tile (ours is the Gulf color)

White subway tile (our tile guy picked ours up but you can find most at any hardware/tile store)

Shower hardware

Bathtub

Toilet

Shiplap

Framed art

Art above toilet: Vintage print from Paris Flea Market, Brass photo holder from Artifact Uprising (they don’t sell the one we have anymore but I love all of their prints and gifts)

Shelf above toilet

Vanity

Faucets

Mirrors

Vanity Lights

Towel Ring

Open shelving and laundry hamper pullout was made by a local cabinet maker and I’m SO happy with it. We did buy this sweet little handle from Amazon to spice it up.

Our Guest Bathroom Renovation (Finally) – Day One (and two)

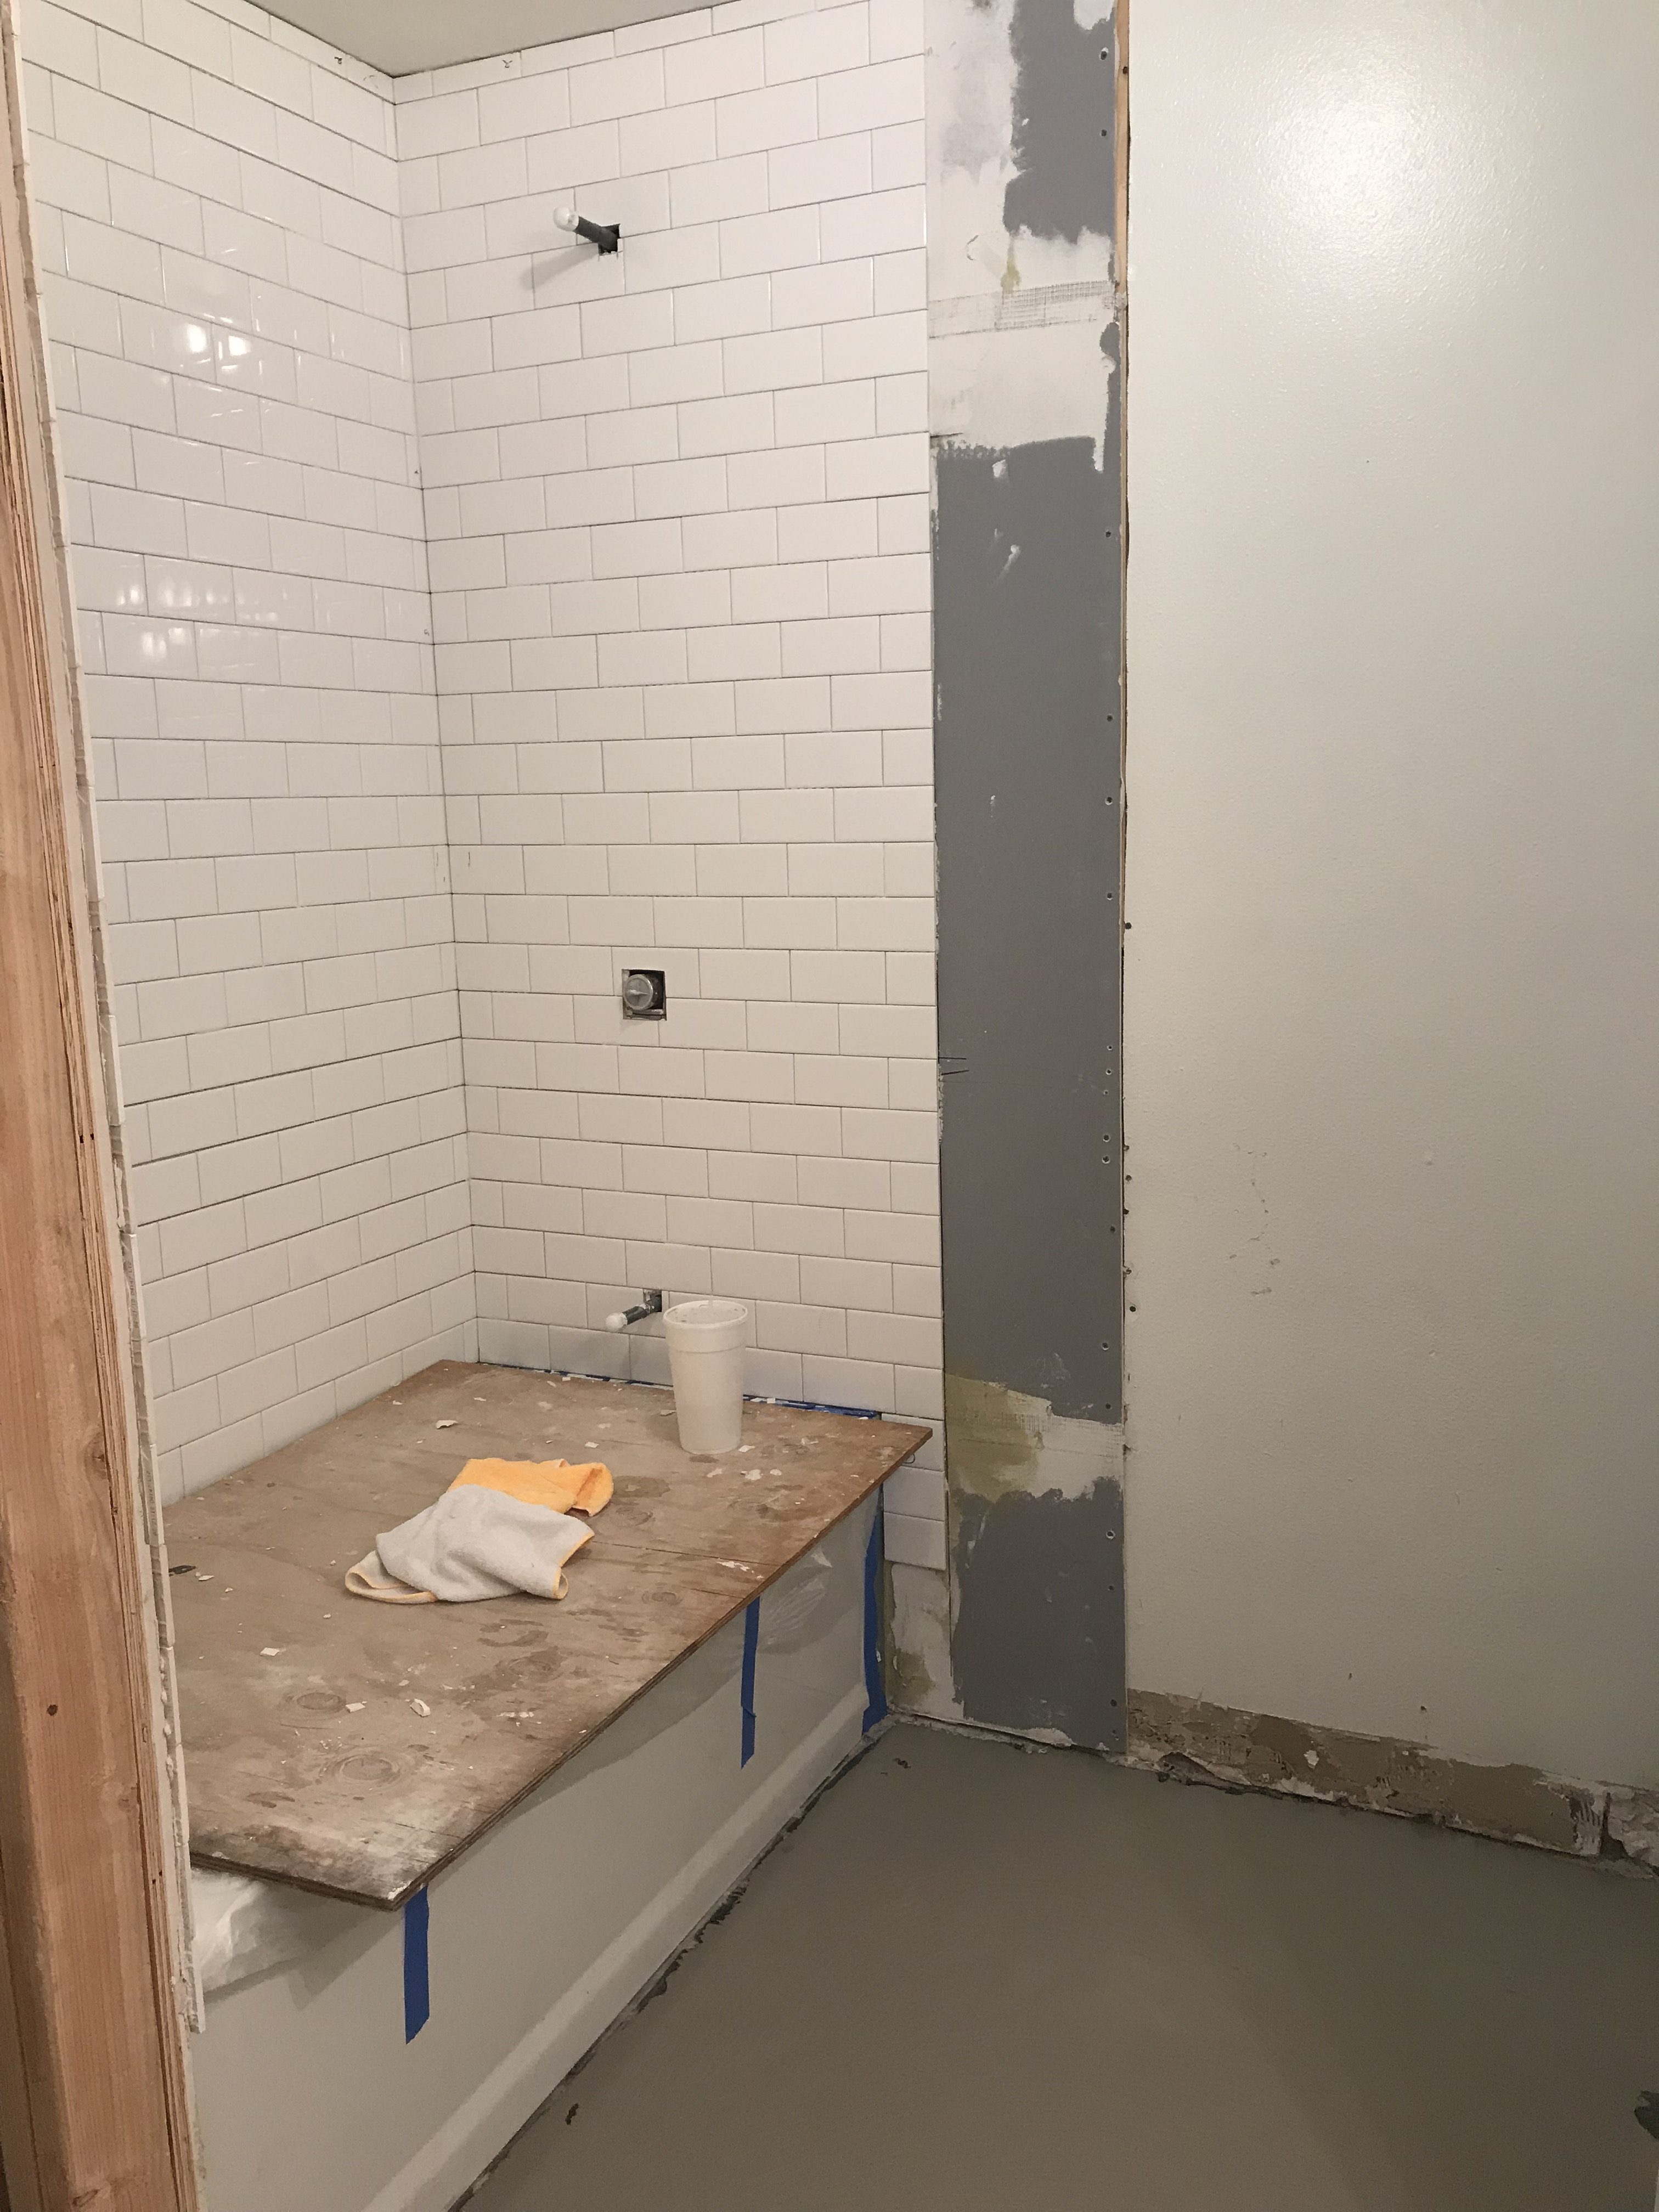
     Here we go!! Our hall bathroom has been gutted since two days after we moved in…and hasn’t changed (two months later) until now. Our tile guy came two days ago and started prepping the room to lay tile yesterday! Ah, you guys. I cannot even wait for two working bathrooms again and to take baths in our new soaker tub. Have I mentioned how excited I am?

Okay, here is what the bathroom looked like when we moved in. Lots of pink, terrible tile, bathtub only (this was a big reason we decided to demo first of all) and a really low vanity. Like even I had to bend over to wash my hands (I’m 5’3″). Literally days after moving in, we couldn’t handle this bathroom (and anticipated things moving a lot quicker with the renovation of it) so Adam started demo-ing. Ripping out that tiled seat behind the tub, taking out the cast iron (aka HEAVY) bathtub and ripping up the tile and the vanity. Have you guys ever seen so much dirt under a tub? I was so grossed out by the fact that that is actually a thing. So gross.

Once everything was cleared out we had a plumber come and replace some of the pipe in the bathtub area and get it all plumbed for a shower. Our shower head in our master bath is so low so Adam wanted to be sure this one was extra tall so that he (and any tall guests we have) could comfortably shower in it. My contractor uncle built the wall behind the tub so we can have a niche, which will be a total game changer. Why do I feel so fancy doing that instead of having a terrible shower hanger thing to hold shampoo? It’s so adult!! haha. The space in between the niche wall and the back wall will be storage. If you saw my stories then you know I’ve been debating over closed cabinetry and open shelving. My heart says open, my head says open (but maybe closed). Here’s the thing, our vanity has two large drawers that we can hide things in and our linen closet is just outside of this bathroom so there’s plenty of closed storage nearby. Plus, baskets hide so much. So basically I don’t know why I ask opinions because I already know what I want to do ; ) Also, swooning hard over that new Kohler soaker tub!

Day one of tile prep looked like this. It’s crazy how some walls can make me so excited!

and then tile started going up!

Day one complete! Floor tile is going in today and ohhhhh man, that transformation is going to be amazing!

In case you needed a reminder about how incredible Exfloorit’s Costa Allegra hex tile is.

You’re welcome.

Choosing our flooring

You may remember (and think we’re crazy) that there was brand new laminate flooring in our house when we purchased it…..and we ripped it ALL OUT.

But my take on it is, why settle with something that’s not going to make you happy? Especially when you care about your home as much as we do. It was the easiest choice to make, for me, and I would do it again in a heartbeat. Now, choosing our new flooring…that was a whole different situation.

But before we talk about that, let’s take a look at what the flooring was like when we moved in. Oh gosh, AND that horrible popcorn ceiling.

And what it looks like now. Ahh, it’s so good, and really, even better in person if you can imagine. It photographs so differently in every lighting and room situation but I’m not even mad about it because it looks so good in each space.

Scroll down to read about how we found it and how we’re liking it so far.

Choosing the flooring was much much harder than we first thought. I mean we want light oak flooring…easy as that right?

We looked through hardwood flooring (too expensive but so so amazing), LVT: Luxury Vinyl Tile, which was still actually really pricey and for some reason I just didn’t love it. Even though it was on the higher price end, it somehow felt cheap to me (please don’t take offense to this. A lot of people pushed this on us so it must be amazing. Just not for us). We just kept going back to laminate, and we’re really happy with our decision.

So, we started our search for the perfect light oak laminate flooring. It’s very annoying how expensive our taste is. We would fall in love with a piece and then realize it was $6/sqft. Um, not going to work. I mean, we just bought a house so we didn’t want to have to shell out 10k for flooring (plus, that doesn’t include installation). So we searched for probably three weeks, going through ten different samples from varying widths to laminate thickness. We’d get a sample, fall in love, and then get an email saying it’s being discontinued and the search would have to begin all over again. These were a few we loved.


Then one afternoon, out of desperation, Adam ordered a random set of samples from Tecsun in City of Industry. The second we took it out of the envelope we knew it was the one. It had a heavy amount of grain and nice warm tones. One word of advice guys…hire someone to measure and quote your flooring square footage before ordering. Apparently our 1500sqft house doesn’t need 1500 sqft of flooring. Anyone need 20 boxes of this stuff? Whoops. Sooo we have a few boxes left over but we’re sure we will need it in the future (kitchen remodel anyone?). In the end we hired out the flooring installation and in two days it went from a construction site to a home and we couldn’t be happier.

We have one con, and one con only, about this laminate. The actual surface of the flooring is pretty thin and a spot has already worn through on one of the planks (a tiny spot, but still). Now, maybe something heavy fell on it or it was just a poorly manufactured plank but that being said it’s still beautiful and we still love it a ton and highly recommend it.

Credits

Laminate: Tecsun Macadamia Oak Flooring (There are a ton of places that carry this laminate. This company is who we found to be the most cost effective with delivery included.)

Rug: Edetta Faded Dendrite Rug

Hall Sconce: Sea Gull Lighting

We’re IN! A final walk through of the house

Well, we’re IN the house!! Such fantastic news! We moved in two weeks ago and have been slowly making it our own, which is hard to do when you literally need to purchase everything. Coming from a 600 sqft apartment to a 1500 sqft house is a giant leap so we are trying to spend wisely (aka not drain our bank accounts to fill the house) and it’s coming along!

Since we haven’t been great at sharing on the blog lately I knew an updated tour was needed so here it is! Days before we moved in, finished baseboards, got a new front door and touched up all that needed to be painted (who am I kidding, that never ends).

We owe you so many updates since we’ve been in the house and those are coming but as usual, be sure to follow us on Instagram since that’s where we show the most! We’ve been busting our butts working on our yard this week and I am loving the outcome already. Can’t wait for all of the summer backyard bashes!!

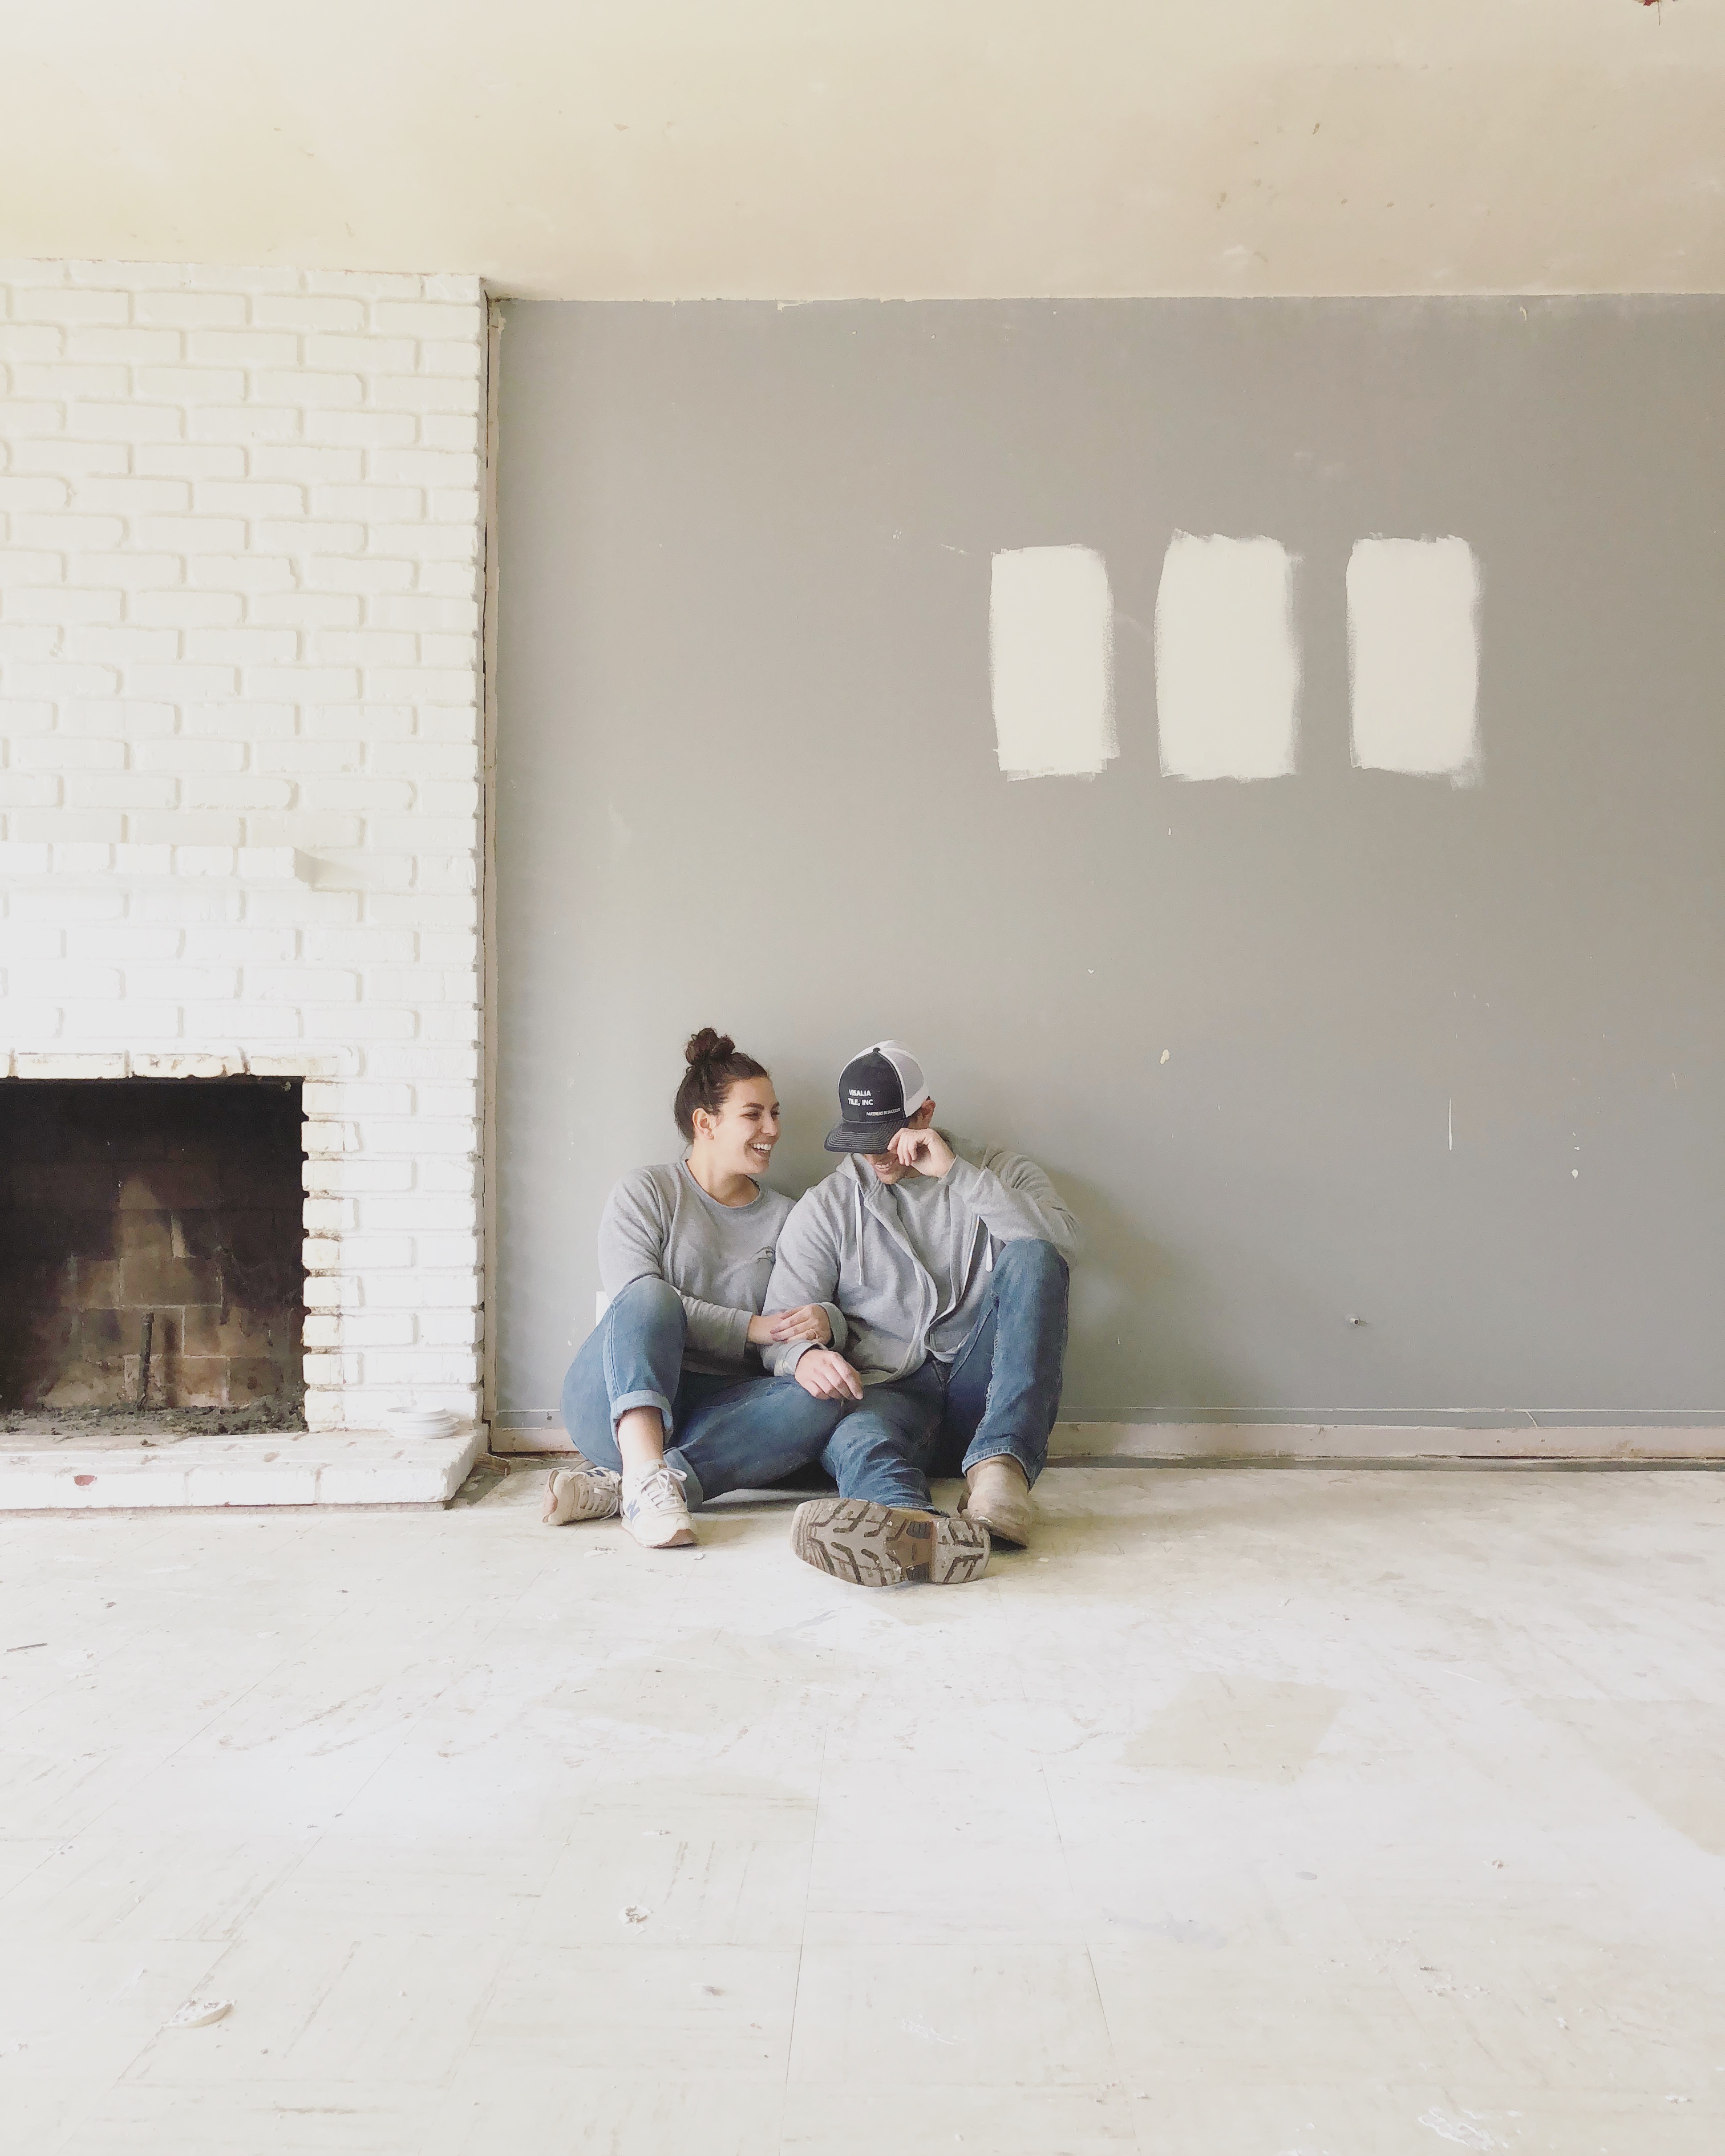
Beam-ing with excitement!

Do you like what I did there?! We’re talking about beams on the blog today and dang, it’s going to look so good once the ceiling is done. This week has been a little slower in the demo department. Adam finished ripping out everything out of the bathroom. Adios pink/peach/whatever color you are tub and sink, and we’ve been trying to decide on tile for the floors. We love a simple hexagon (of course in white) but recently, aka last night, we thought, maybe we could be a tad bit more fun? We’ll see what happens there.

I painted almost identical paint swatches on the wall to try and pick the perfect paint color for the house. I swear there’s a difference, you guys. And I think we’re going to go with Swiss Coffee, which seems to be a pretty popular one so I’m guessing it’s a great color!  AND, Adam ripped out the nasty fireplace insert and holy smokes, it already looks 10x better, even with the spider webs and dirt!

But, the topic for today is beams, so let me get back to that. So, if you remember us talking about our plans for this weird, half wall in our videos then you’ll recall we wanted to knock it down and extend that load bearing beam into the wall attached to the kitchen. Well, yesterday on our lunch break, my Mom and I decided to get to work on it, and twenty minutes later we made progress! The guys are getting the beam work in the attic done this weekend and we need to stain our beams (more on that below) and the guys need to come back and sand and patch the ceiling, and, and, and (that’s literally what my brain feels like right now).

How much better will that look!? I love that you’ll be able to walk into the living area and see our gorgeous dining table (oh ya, that we bought this week, you know, before we purchase floors) I linked it here and am SO excited about it!

Here’s a little of our inspiration for our ceilings. At first we figured we’d just paint everything white, I KNOW guys but we just love how clean it looks, but we’ve now decided to keep the beams a wood tone to warm up the space a bit. I love this image below and it was our very first inspiration photo.

via Pinterest

via Pinterestvia Studio McGee

Adam found this great post about how to age new wood and it looks exactly like how we want ours to look so fingers crossed we can do it right and it looks like this!! Take a peak at the blog post here if you want to try it too!

Be sure to follow our Instagram for more recent updates and polls about brass or brushed nickel in the bathroom. Ps. Brass wins 😉

Copyright © 2023 · Theme by 17th Avenue